Update and manage modules you created
After you create and upload a module, you can update, delete, or change its visibility settings.
For information on pinning module deployments to versions, see Module versioning.
Update a module
Once your module is in the registry, there are two ways to update it:
Update automatically using GitHub Actions: Recommended for ongoing projects with continuous integration (CI) workflows, or if you want to build for multiple platforms.
- If you enabled cloud build when you generated your module, the GitHub Actions are already set up for you.
Update manually using the Viam CLI: Fine for small projects with one contributor.
Update automatically from a GitHub repo with cloud build
Use GitHub Actions to automatically build and deploy your new module version when you create a new release in GitHub:
Edit your module code and update the
meta.jsonfile if needed. For example, if you’ve changed the module’s functionality, update the description in themeta.jsonfile.Important
Make sure the
urlfield contains the URL of the GitHub repo that contains your module code. This field is required for cloud build to work.Push your changes to your module GitHub repository.
Tip
If you used
viam module generateto create your module and enabled cloud build, and you followed all the steps to deploy with cloud build including adding API keys for the build action, all you need to do to trigger a new build is publish a release in GitHub as you did when you first published the module.If you did not use the Viam CLI generator and enable cloud build, you can set up one of the following GitHub Actions up manually:
The
build-actionGitHub action provides a cross-platform build setup for multiple platforms: x86, ARM Linux, and macOS.In your repository, create a workflow file called
build.yml in the.github/workflows directory: on: release: types: [published] jobs: publish: runs-on: ubuntu-latest steps: - uses: actions/checkout@v3 - uses: viamrobotics/build-action@v1 with: version: ${{ github.ref_name }} ref: ${{ github.sha }} key-id: ${{ secrets.viam_key_id }} key-value: ${{ secrets.viam_key_value }} token: ${{ github.token }} # only required for private git reposThe
build-actionGitHub action relies on a build command that you need to specify in themeta.json file. At the end of yourmeta.json , add the build configuration:{ "module_id": "example-module", ... "build": { "setup": "./setup.sh", // optional - command for one-time setup "build": "./build.sh", // command that will build your module's tarball "path" : "dist/archive.tar.gz", // optional - path to your built module tarball "arch" : ["linux/amd64", "linux/arm64", "darwin/arm64"], // architecture(s) to build for "darwin_deps" : ["go", "x264", "nlopt-static"] // optional - Homebrew dependencies for Darwin builds. Explicitly pass `[]` for empty. } }You can test this build configuration by running the Viam CLI’s
build localcommand on your development machine:viam module build localThe command will run your build instructions locally without running a cloud build job.
For more details, see the
build-actionGitHub Action documentation, or take a look through one of the following example repositories that show how to package and deploy modules using the Viam SDKs:If you already have your own CI with access to arm runners or only intend to build on
x86ormac, you can use theupload-moduleGitHub action instead which allows you to define the exact build steps.Add this to your GitHub workflow:
on:
  push:
  release:
    types: [released]

jobs:
  publish:
    runs-on: ubuntu-latest
    steps:
      - uses: actions/checkout@v3
      - name: build
        run: echo "your build command goes here" && false # <-- replace this with the command that builds your module's tar.gz
      - uses: viamrobotics/upload-module@v1
        # if: github.event_name == 'release' # <-- once the action is working, uncomment this so you only upload on release
        with:
          module-path: module.tar.gz
          platform: linux/amd64 # <-- replace with your target architecture, or your module will not deploy
          version: ${{ github.event_name == 'release' && github.ref_name || format('0.0.0-{0}.{1}', github.ref_name, github.run_number) }} # <-- see 'Versioning' section below for explanation
          key-id: ${{ secrets.viam_key_id }}
          key-value: ${{ secrets.viam_key_value }}
Set
runto the command you use to build and package your module, such as invoking a makefile or running a shell script. When you are ready to test the action, uncommentif: github.event_name == 'release'to enable the action to trigger a run when you issue a release.For guidance on configuring the other parameters, see the documentation for each:
org-id: Not required if your module is public.platform: You can only upload one platform at a time.version: See Using the –version argument for more details on the types of versioning supported.
For more details, see the
upload-moduleGitHub Action documentation, or take a look through one of the following example repositories that show how to package and deploy modules using the Viam SDKs:Create an organization API key with owner role:
viam organizations api-key create --org-id <org-id> --name <key-name>Add the key ID and value as GitHub repository secrets named
viam_key_idandviam_key_value.Create a release in GitHub to trigger the build. The build can be quick or take over 15 minutes to complete, depending on factors including the size of the module.
Once the build is complete, the module will automatically update in the registry, and the machines set to use the latest version of the module will automatically update to the new version.
Supported platforms for automatic updates
When using cloud build, you can specify which platforms you want to build your module for in the arch field of your meta.json file.
The following table lists all available platforms:
| Platform | Supported in cloud build | Container used by cloud build | Notes |
|---|---|---|---|
linux/amd64 | ✅ | Ubuntu | Standard x86_64 Linux platform. |
linux/arm64 | ✅ | Ubuntu | For ARM64 Linux devices like Raspberry Pi 4. |
darwin/arm64 | ✅ | macOS | For Apple Silicon Macs (M1/M2/M3). |
linux/arm32v6 | ❌ | N/A | For older ARM devices; must be built manually. |
linux/arm32v7 | ❌ | N/A | For 32-bit ARM devices; must be built manually. |
windows/amd64 | ⚠️ | N/A |
|
darwin/amd64 | ❌ | N/A | Intel Macs; must be built manually. You can choose to support it, though many modules do not since Apple is phasing out this platform. |
Note
While the registry supports additional platforms like windows/amd64, linux/arm32v6, and linux/arm32v7, these are not currently supported by cloud build and must be built and uploaded manually.
Update manually
Use the Viam CLI to manually update your module:
Edit your module code and update the
meta.jsonfile if needed. For example, if you’ve changed the module’s functionality, update the description in themeta.jsonfile.Package your module files as an archive:
tar -czf module.tar.gz run.sh requirements.txt src meta.jsonFor Go modules, build the binary first, then package it:
tar -czf module.tar.gz my-module meta.jsonSupply the path to the resulting archive file in the next step.
Upload to the Viam Registry:
viam module upload --version <version> --platform <platform> <module-path>For example,
viam module upload --version 1.0.1 --platform darwin/arm64 my-module.tar.gz.
When you upload a module, the command performs basic validation of your module to check for common errors.
For more information, see the viam module command.
Change module visibility
You can change the visibility of a module from public to private if:
- you are an owner of the organization that owns the module, AND
- no machines outside of the organization that owns the module have the module configured (no other orgs are using it).
To change the visibility:
Navigate to your module’s page in the registry.
Hover to the right of the visibility indicator near the right side of the page until an Edit button appears, and click it to make changes.
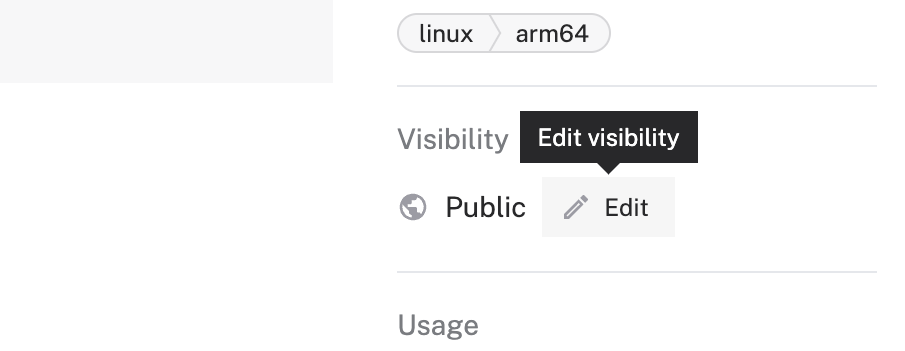
The options are:
- Private: Only users inside your organization can view, use, and edit the module.
- Public: Any user inside or outside of your organization can view, use, and edit the module.
- Unlisted: Any user inside or outside of your organization, with a direct link, can view and use the module. Only organization members can edit the module. Not listed in the registry for users outside of your organization.

You can also edit the visibility by editing the meta.json file and then running the following CLI command:
viam module update
Delete a module
You can delete a module if:
- you are an owner in the organization that owns the module, AND
- no machines have the module configured.
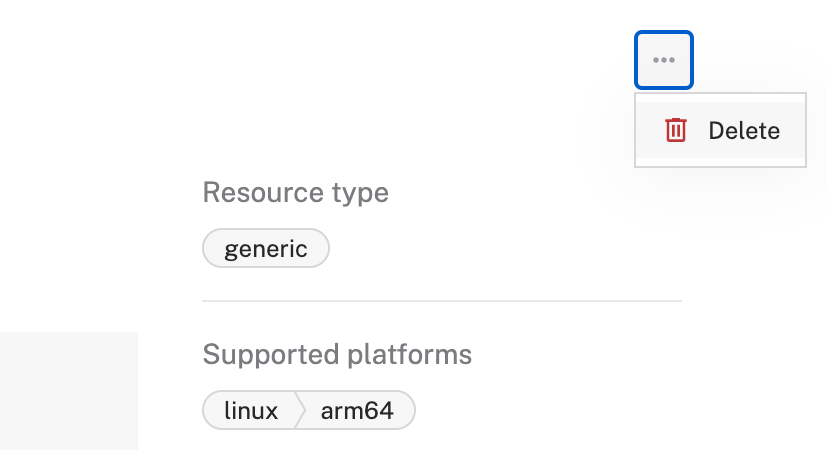
To delete a module:
Navigate to its page in the registry.
Click the … menu in the upper-right corner of the page, and click Delete.

Note
If you need to delete a module and the delete option is unavailable to you, please contact our support team for assistance.
Delete just one version of a module
Deleting a version of a module requires the same org owner permissions as deleting the entire module, and similarly, you cannot delete a version if any machines are using it. To delete just one version of a module:
Navigate to its page in the registry.
Click Show previous versions under the Latest version heading.
Hover on the architecture pill next to the version you’d like to delete and click the trash icon.
You cannot upload a new file with the same version number as the deleted one. To upload another version, you must increment the version number to a later version number.
Transfer ownership of a module
To transfer ownership of a module from one organization to another:
You must be an owner in both the current and new organizations.
Navigate to the module’s page in the registry.
Make sure the visibility of the module is set to Public.
Click the … menu in the upper-right corner of the page, and click Transfer ownership.
Select the new organization from the dropdown menu, then click Transfer module.
(Recommended) Transfer the GitHub repository containing the module code to the new owner. Be sure to remove the existing secrets from the repository’s settings before transferring. If the repository is using Viam’s cloud build, the secrets contain an organization API key that will be exposed to the new owner after the repository transfer.
Update the
meta.jsonfile to reflect the new organization:- Change the first part of the
module_idfield to the new organization’s namespace. - For each model, change the first part of the
modelfield to the new organization’s namespace. - Update the
urlfield to point to the new code repository if it has moved.
- Change the first part of the
Update the module code:
- Throughout your module implementation code, change the model names in your component or service classes to match the changes you made to the
meta.jsonfile.
- Throughout your module implementation code, change the model names in your component or service classes to match the changes you made to the
Publish a new version of the module to the registry by following either set of update steps on this page. This ensures that the model names in the module code match the registered model names in the registry.
(Recommended) Update the
modelfield in the configuration of any machines that use the module to use the new organization’s namespace. Viam maintains backwards compatibility with the old namespace, but you should update the configuration to use the new namespace to avoid confusion.
Rename a module
You can rename a module that your organization owns through the Viam web interface. To rename a module:
- Navigate to your module page at
app.viam.com/module/<namespace>/<module-name>. - Click the … menu in the top right corner of the module page.
- Select Rename from the dropdown menu.
- Enter the new module name in the modal that appears.
- Click Rename to confirm the change.
When you rename a module, Viam reserves the old module name for backwards compatibility and you cannot reuse it.
Existing machine configurations containing the old module name will continue to work.
Was this page helpful?
Glad to hear it! If you have any other feedback please let us know:
We're sorry about that. To help us improve, please tell us what we can do better:
Thank you!